How to Find the Perfect Spot for Your Plant
Wondering what plant to put where? Here’s an indoor plant lighting guide to four categories of light exposure for house plants.
What is a sunny (direct sun) location?
- Within 2 feet of a south- or southwest-facing window.
- Window sills flooded with sunlight.
- A sun room (If you have one, lucky you!)
What is a bright (indirect sun) location?
- Within 4-5 feet of an east- or west-facing window.
- 3-5 feet from a window that faces south or southwest.
- Any place where the sun shines into a room for several hours.
What is a partially shaded (low light) location?
- An east-facing window where the morning sun shines into the room for only a few hours. Morning sun is cooler than afternoon sun, so you don’t have to worry about overheating your plant.
- At least 3-5 feet away from a window that faces south or southwest.
- Directly in front of a north-facing window gives a plant low-to-medium light intensity.
What is a shady location?
- More than 6 feet away from a south- or southwest-facing window.
- Hallways, staircases, and corners of rooms.
- Near windows that are shaded by trees.
Getting Indoor Plant Lighting Right:
Not Enough Light…or Too Much?
How do you know when your house plant is not getting enough light? It will tell you. Here are some things to look for:
- Growth is spindly, with long spaces between leaves
- New leaves are smaller than existing ones
- Lower leaves turn yellow and fall off
- No growth or slow growth
- Flowering plants fail to bloom or bloom poorly
- Variegated leafy plants turn a solid green
- New shoots reach out and grow toward the light
Here are some signs that your plant is getting too much light:
- Brown scorched patches on leaves
- Leaves look faded or washed out
- Plant wilts at midday
- Leaves become dry and fall off
Growing House Plants with Artificial Light
If your rooms don’t have enough light for your house plants, artificial indoor plant lighting may be the solution. It can supplement natural daylight — or even replace it during the winter months when the days are shorter and the intensity of light is much lower.
Artificial lights provide the sun’s spectrum of wavelengths, which we identify as colors. For example, white light carries all the colors of the rainbow. Plants need the cool blue and violet hues of the spectrum for foliage, and the warm red and orange for flowering.
Reading light is mostly green and yellow — two colors that plants don’t need.
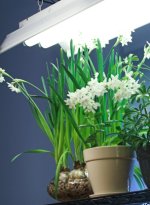
Fluorescent lights are efficient because they provide the type of light (the blue and red parts of the spectrum) that plants need for photosynthesis. A good setup includes a half-and-half combination of cool-white and warm-white fluorescent tubes mounted under a reflector. They should be 40 watts each.
Keep foliage plants at least 12 inches below the lights and flowering plants 6-12 inches below the lights. If it’s not practical to lower the light fixture, you can raise the plants themselves.
Which plants are best for artificial light? Many flowering house plants come to mind because they need bright light to bloom: begonia, bromeliad, African violet, orchid, and cyclamen. However, many foliage plants also respond beautifully to artificial lighting: polka-dot plant, spider plant, peperomia, nerve plant, and aloe vera.
How long should lights be on? It depends on the type of plant. Foliage plants need about 14-16 hours of light per day. Flowering plants need 12-16 hours of light per day. Darkness is also important for plant growth so this gives your plants at least 8 hours of total darkness a day. Try to have the lights on at the same time every day. You can get an automatic power strip with timer for your lights to make it easier. Just set it and it’ll come on the same time every day.
If you water your plants on a schedule, you’ll want to keep a closer eye on them. Plants grown under artificial indoor plant lighting may dry out quicker and need watered more often.
It’s also a good idea to increase the humidity levels around your plants. One of the easiest ways to do this is by using pebble trays. I like this idea because it allows the water that drains out of the drainage hole in each pot to flow into the tray of pebbles, creating extra humidity around your plants. And your plants will love it.
Watering House Plants
Although it seems easy enough, watering house plants is responsible for killing more plants than anything else. These indoor plant watering tips will help to keep your plants healthy.
So How Much Water Does a Plant Need?

The answer varies with the species and its native habitat, the soil in which it is growing, and the light, temperature, and humidity in your home. Plants with a lot of leaf surface or soft, lush foliage will be thirstier than those with less foliage or waxy or leathery leaves.
House plant watering needs are also affected by the growth cycle of the plant. A plant absorbs more water during active growth periods than during rest periods.
What kind of pot have you got? The size and type of container are other important factors: in a small pot, moisture is absorbed quickly, a too-large pot will retain too much water. A plant in a porous clay pot will need watering more frequently than one in a plastic or glazed pot.
How to Tell if a Plant Needs Watering
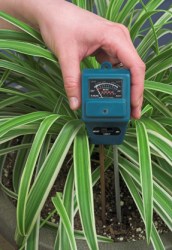
A moisture meter can help you measure the moisture in the soil.
Green Thumb Tip
Make sure the plant is thoroughly watered and then allowed to dry out a bit before it is watered again. Water well, but not often.
If you don’t have one, just poke your finger in the soil up to the first knuckle — it’s the surefire way to know if your plant needs watered. Does the soil feel damp? Don’t water. Does the soil feel dry? Water.
Too Much of a Good Thing?
Contrary to popular belief, over-watering house plants is more often the cause for a plant’s problems than under-watering. Since roots cannot absorb more water than the plant needs, the excess water will take the place of oxygen in the soil. Plants need oxygen just like we do. Soggy soil suffocates the roots and leads to rot.
If you think you’ve hopelessly waterlogged a plant, try these tips:
- Tip the plant on its side for a few minutes to allow the water to drain out.
- Cover the top of the soil with paper towels to absorb the extra moisture. Replace them with dry paper towels when they become saturated.
- If the plant starts to wilt or lose its leaves, repot it right away with fresh soil into a container that has good drainage.
Bottom-Line Watering House Plants Guidelines
- Use water at room temperature (68° F/20° C).
- Water thoroughly, then allow the soil to dry out a bit before watering again.
- Don’t over-water — it’s the #1 reason house plants die.
How to Choose House Plant Fertilizer
The fertilizer you need depends on your plant. Read the labels carefully. They usually list three numbers, such as 10-20-10. These are (in order) the percentages of nitrogen, phosphorus, and potassium (often called potash) that make up the major nutrients in the house plant fertilizer. And here’s what they do:
Nitrogen gives the plant lush, green foliage and promotes growth.
Phosphorus keeps roots strong and healthy, and encourages flowering.
Potassium makes stems strong and helps fight off diseases.
Fertilizers specially formulated for flowering plants will contain less nitrogen and more phosphorus and potassium. You’ll even find some labeled for specific plants, such as orchids.
Most house plants need a balanced fertilizer such as a 10-10-10 formula.
In addition to nitrogen, phosphorus, and potassium, plants need small amounts of other nutrients, or trace minerals — called micronutrients.
You’ll find some of these minerals, such as calcium, magnesium, and sulfur in good-quality potting mixes. And even smaller quantities of copper, iron, and zinc. However, plants that aren’t repotted very often will need fertilizer to replenish their supply of micronutrients.
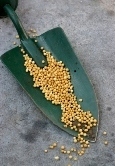
Water-soluble fertilizers are the most common and are easy to use. You’ll find them in the forms of liquid, powder, or crystals. Manufacturers often suggest to use the maximum amount that a healthy plant can tolerate. This sells a lot of fertilizer, but may be too much for your plant. As a general rule, I use only half the recommended amount.
Slow-release granules (shown at left) are easy to use because you just sprinkle them on top of the soil and they’ll dissolve when you water your plant.
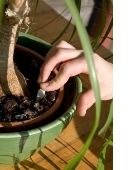
Fertilizer spikes (at left) work the same way, but are inserted into the soil. Push spikes fairly deeply into the soil near the edge of the pot to avoid damaging the plant’s roots.
Although the roots are responsible for taking in nutrients, the leaves can also absorb them. Foliar feeding is a quick way to revive a plant that has been deprived of nutrients. Most fertilizers will scorch leaves if they are sprayed directly on the leaves, but foliar feeds are made to be applied this way.
How to Know When Your Plant Needs Fertilizing
Here are some clues:
- Weak new growth
- Pale leaves
- Dropped leaves
- Weak stems
- Small or no flowers
Whoa, there gardener! Many indoor gardeners mistakenly believe more is better when it comes to fertilizing house plants. The truth is, far more plants suffer from too much fertilizer than lack of it. Excess fertilizer can burn roots and leaves. When in doubt, use less.
How do you know if you’ve over-fertilized your plant? Look for these symptoms:
- Scorched edges or brown spots on leaves
- Misshaped leaves
- Wilting leaves
- White crust on the surface of the potting mix
Bottom-Line Fertilizing Guidelines
- Never feed a new or newly repotted plant. A plant that relocates from the garden center to your home is stressed and will need a month or two to adjust to its new environment. Good potting mixes contain nutrients to feed a repotted plant for several weeks.
- Don’t use as much house plant fertilizer as recommended on the label. For some reason, manufacturers suggest the maximum amount that a healthy plant can tolerate. I generally use half that amount.
- Fertilizer is not a cure-all for an unhealthy plant. Never feed a plant that’s suffering from root damage, disease or insects.


